Showing posts with label dessert. Show all posts

Wednesday, March 23, 2011

Persimmon Bread

Come late fall the hachiya persimmons (the squishy ones) on my back yard tree are finally soft enough for eating and baking. Slices of this persimmon bread are great with tea, as an appetizer with goat cheese, for dessert with whipped cream, or anytime you want a sweet treat. These mini-loaves wrapped up with a bow make great holiday presents.


3½ cups flour
1½ teaspoons salt
2 teaspoon baking soda
1 teaspoon nutmeg
2-2½ cups sugar (I use the smaller amount)
1 cup (2 sticks) melted butter
4 eggs, lightly beaten
2/3 cup Jack Daniels or cognac
2 cups persimmon purée (about 7 medium very soft hachiya persimmons)
1 cup chopped walnuts
1 cup raisins

1. Sift flour, salt, baking soda, nutmeg, and sugar together into a bowl. Mix together the melted butter, eggs, Jack Daniels, and persimmon purée.
2. Make a well in the dry ingredients and pour in the melted butter mixture. Mix together. Fold in the nuts and raisins and mix well.
3. Pour the mixture into 6 buttered mini pans, filling ¾ full.
4. Bake at 350°F for about 45 minutes. You’ll need to increase the baking time for the bigger loaves. Let cool in the pans for 15 minutes; then turn out of the pans onto a rack to finish cooling. Wrap carefully in plastic wrap or foil. They freeze well.

Makes 6 mini loaves, 4 small loaves, or 2-3 regular loaves
Adapted from Susan Weeks, Co-President, Meals on Wheels, Sonoma, as it appeared in The Sun, December 2005

Tuesday, March 22, 2011

Apple Almond Crisp

The apples for this crisp (or, as some would have it, "crumble") came from my backyard in Sonoma. I picked them and used them immediately. Talk about local. Talk about fresh. Can't get any better.


7-8 cups firm, peeled, cored tart-sweet apples, cut in 1-inch chunks
Note: 1 apple yields about 1 cup of chunks I’ve found.
1 tablespoon grated lemon zest or zest from 1 lemon, see photos if you need them
3-5 tablespoons lemon juice
1/3 cup sugar or a little more to taste
¼ cup maple syrup
1 teaspoon cinnamon
½ teaspoon ground nutmeg
½ teaspoon salt

Topping:
½ cup sugar
¾ cup unbleached all-purpose flour
½ teaspoon cinnamon or coriander or both
½ teaspoon salt
8 tablespoons (1 stick) cold unsalted butter, cut in ½-inch pieces
¼ cup chopped candied ginger or dried cranberries
½ cup sliced almonds

Vanilla ice cream, whipped cream or crème fraiche

1. Place a rack in the bottom third of the oven. Preheat the oven to 375°F.
2. Grease a 2-quart ovenproof glass or earthenware casserole that is at least 2 inches deep.
3. In a large bowl, mix the lemon zest and juice, sugar, maple syrup, cinnamon, nutmeg, and salt. As you peel, quarter and chunk the apples, add them to the bowl and stir so the lemon juice can prevent their turning brown. Taste the apples. Add more lemon juice and/or sugar, as needed, to achieve a nice balanced flavor. Place the apples in the casserole.
4. To make the topping: Stir the sugar, flour, cinnamon, and salt together. Cut in the butter with a food processor, a pastry cutter or your fingers until the mixture is crumbly. Stir in the ginger and the almonds.
5. Cover the apples evenly with the topping and bake for 50-60 minutes until the juices are bubbling and the top has browned. Because the back of the oven is usually hotter than the front in most ovens, it is a good idea to rotate the baking dish once or twice to brown the topping evenly.
6. Cool at least 10 minutes before serving. Serve warm or at room temperature with vanilla ice cream, whipped cream, or crème fraiche.

At least 6 servings
Adapted from Marian Burros’ Cooking for Comfort

Individual Berry Crumbles

This is the perfect dessert during berry season. You can make this in one larger container, such as a gratin dish, without any changes.


3 cups blackberries or comparable amount of blueberries or raspberries or a mix of all three
2 tablespoons sugar
1 cup flour plus 1 tablespoon
½ cup firmly-packed brown sugar
½ teaspoon salt
1 teaspoon baking powder
3 tablespoons oats (quick-cooking or regular)
2 tablespoons chopped candied ginger
6 tablespoons butter, cut into small pieces
Serve with vanilla ice cream, lightly sweetened whipped cream, crème fraiche or mascarpone mixed with a little sugar and milk or cream.

1. Place the berries, sugar and 1 tablespoon flour in a bowl and stir to mix. Divide the berries into four shallow ovenproof bowls.
2. Place the brown sugar, baking powder, salt, oats, and remaining flour in a bowl (you can use the same berry bowl) and mix well. Add the butter, rubbing it in with your fingers until the mixture resembles coarse breadcrumbs. You can also use a pastry cutter.
3. Sprinkle the berries with this mixture. Bake at 400ºF for 20-25 minutes until golden brown and bubbling. Serve warm with one of the suggested toppings.

4 servings
Adapted from Bill Granger’s Sydney Food

Chocolate Pots

These little pots are so good. And so easy. Nigella calls for 70% cocoa solids but I find that percentage just too intense. You can experiment for yourself. Some folks might be nervous about putting the raw egg into the chocolate mixture. If you are, don’t make this recipe. I’ve never had a problem.


6 ounces best-quality chocolate, minimum 62% cocoa solids
½ cup plus 2 tablespoons heavy cream
1/3 cup plus 1 tablespoon whole milk
½ teaspoon vanilla
½ teaspoon allspice, optional
1 egg at room temperature, use the freshest you can find
8 ¼-cup pots, sake cups, or tiny custard cups
Roasted Strawberries during strawberry season, optional
A dab of slightly sweetened whipped cream, optional

1. Crush the chocolate to crumbs in the food processor.
2. Heat the cream and milk until just about boiling. Add the vanilla and the optional allspice to the milk and pour it through the funnel over the chocolate. Let it stand for 30 seconds.
3. Process for 30 seconds. Then crack the egg down the funnel and process for 45 seconds. It’s done.
4. Pour into whatever little cups you have and refrigerate for 6 hours or overnight. Take them out about 20 minutes before you want to serve them.
Note: Don’t be tempted to use larger dishes. The chocolate is very intense and just a little is sufficient.

8 servings
Adapted from Nigella Lawson’s Nigella Bites

Ginger Pots de Crème

I have fussed over this recipe repeatedly because I didn’t seem to be able to get the excellent ginger flavor I wanted. I tried many different solutions and finally found the one that worked: using my trusty micro-plane. I am satisfied that if you make this lovely dessert, you too will be totally pleased with its deliciousness.


2 cups heavy cream
½ cup sugar
5 ounces fresh ginger, peeled and grated with a micro-plane
2 yolks and 2 whole eggs, lightly beaten
¼ teaspoon salt
Diced candied ginger or Raisin Ginger Compote, see recipe below

1. Combine the cream and the sugar in a saucepan. Bring it to the point where it is just barely boiling and the sugar has dissolved. Add the ginger. Remove from the heat, cover the pan, and let it steep for 1 hour or longer.
2. Strain out the ginger, pressing to release as much liquid as you can.
3. Add the eggs and egg yolks to the cream. Stir gently to mix well. Pour through a fine-mesh strainer.
4. Preheat the oven to 325ºF.
5. Pour the mixture into 5 or 6 4-ounce ramekins. Place them in a baking pan and add enough hot water to come halfway up the sides of the cups. Bake until the custard is just set 40-50 minutes. The custard should be soft in the center when lightly shaken. They will firm up as they set. Remove from the baking pan and cool. Place in the refrigerator until ready to serve.
6. Before serving, garnish with the candied ginger or Raisin Compote.

5-6 servings
Adapted from Annie Somerville’s Fields of Greens

Raisin Ginger Compote

½ cup golden raisins
¼ cup chopped candied ginger
¼ cup ginger syrup (If you can’t find this, use ½ cup maple syrup)
¼ cup maple syrup
¼ cup bourbon but you could use Madeira, sherry, or marsala

1. Place the raisins and candied ginger in a bowl. Add the remaining liquids and let the raisins and ginger macerate for an hour or more.
2. Spoon some of the fruits and the liquid over the pots de crème and serve.

Makes about 1½ cups
My own devising

Buttermilk Panna Cotta

A cool and refreshing Italian treat on a summer evening with the wonderful hit of concentrated strawberry flavor from Roasted Strawberries.


1½ cups half and half or whole milk
½ cup sugar
Grated zest of 2 lemons or 1 lemon and 1 orange, best to use a microplane
2 cinnamon sticks
1 envelope unflavored gelatin
3 tablespoons cold water
¼ teaspoon salt
¾ cup buttermilk
Fresh strawberries or Roasted Strawberries
Fresh mint for garnish

1. Warm the half and half, sugar, zest, and cinnamon sticks in a non-reactive saucepan. Once the mixture begins to steam, remove it from the heat, cover, and let steep for 30 to 60 minutes.
2. In a medium-sized bowl, sprinkle the gelatin over the cold water and let it soften for 5 minutes.
3. Rewarm the infused half and half, then pour it through a strainer over the softened gelatin, stirring to dissolve it completely. Press the zest to release as much of the liquid as possible. Add the salt. Let the mixture cool.
4. Stir in the buttermilk. (If the mixture is steaming hot when you add the buttermilk, the mixture can separate. If it does, whisk it vigorously until it is smooth.)
5. Lightly grease 5 or 6 4-ounce ramekins with unflavored oil. (If you use smaller ramekins, you’ll make more desserts.) Divide the panna cotta mixture evenly among the prepared ramekins and refrigerate for at least 4 hours.
6. To serve, run a sharp knife around the inside edge of each ramekin to release the panna cotta. Invert each one on a serving plate. Spoon the strawberries (roasted or fresh) around it. Add a sprig of fresh mint if you like.

5-6 servings in 4-ounce ramekins
Adapted from David Lebovitz’s Ripe for Dessert
He serves his with a blueberry sauce.

Italian Lemon Ice

I find it best to start this process in the morning before serving for dessert at dinner—just to make sure the mixture freezes sufficiently. It is the perfect dessert after a heavy meal or anytime during the summer. Light and refreshing.


1½ cups water
1 cup plus 2 tablespoons sugar
1 tablespoon finely grated fresh lemon zest, best done with a microplane
1 cup fresh lemon juice
Pinch of salt

1. Bring the water and sugar to a boil in a 1-quart heavy saucepan, stirring until the sugar has dissolved.
2. Remove from the heat and stir in the zest, juice, and salt.
3. Transfer to a metal bowl and cool the syrup to room temperature. Refrigerate the syrup for at least one hour.
OR
If you are in a rush, as I usually am, you can put the bowl containing the mixture into a larger bowl filled with ice to cool it down more quickly.
4. Freeze the syrup in an ice cream maker.
OR what I usually do
Line an 8 x 8 metal pan with plastic wrap and pour the cooled mixture into it. Place it in the freezer of your refrigerator. Periodically, pull the pan out of the freezer (two or three times) and stir the mixture to break up the ice crystals.
5. Transfer to an air-tight container and freeze until firm, about two hours. Remove from the freezer about 5 minutes before serving.

Makes about 1 quart
Adapted from Ruth Reichl’s The Gourmet Cookbook

Royal Grapefruit Sorbet


3 large pink grapefruits
3 tablespoons honey (in liquid form)
Black pepper, if desired

1. Remove and discard peels from the grapefruits. See instructions below. Place in a single layer on a microwave-proof dish or a cookie sheet lined with wax paper and freeze for three hours or overnight until solid.
2. Microwave on defrost for 1 minute if you used the microwaveable dish. The sections should be just slightly thawed. If you used a cookie sheet, transfer a single layer of the frozen segments to a plate and defrost for 1 minute; you may need to do 2 batches.
3. If your sections are big, break them up into smaller pieces. Place in a food processor and pulse until finely chopped. Add the honey and process until smooth. You may have to do this process in batches depending on the size of your machine. Place the sorbet in a container and return to the freezer for a few hours or until serving time.
4. Scoop into bowls or serve on top of fresh fruit salad. For a spicy note, sprinkle with ground black pepper, if desired.
Note: If sorbet becomes too hard to scoop, microwave on defrost for one minute. It will keep in freezer for two weeks.

5-6 servings (about 3 cups)
Adapted from brochure from Harry and David’s Fruit of the Month Club Brochure

How to section citrus

1. Cut off both ends of the grapefruit or other citrus fruit.


2. With a serrated knife, cut a strip around the top of the grapefruit, using a sawing motion. Keep moving down and around the grapefruit until you have reached the bottom. The hope is to remove the skin and the white pith without removing too much of the precious flesh of the fruit. If you have missed any of the pith, cut it off.
3. Remove the sections by cutting along one side of the membrane and then on the other side of the membrane. Slide out the section. Best to do this step over a bowl to catch the juice.
4. Continue around the grapefruit until you have removed all the grapefruit sections. Squeeze the bundle (bottom right) of membranes to extract as much juice as possible. Use it in a recipe or drink as a reward.
5. Refrigerate the bowl and juice if you are not using right away. You can peel and section the citrus the day before you are going to use it.

Oven-Roasted Grapes

I often have some leftover grapes lurking in the fridge after I've used part of a bunch for a salad or something else. Roasting them is a perfect way to give the lurkers a second life. They taste as though they are on their way to becoming raisins, but juicier.


2 pounds red grapes, without seeds
A slight sprinkling of sugar

1. Remove the grapes from their stems. Cut in half if large. Line a rimmed baking sheet with a silicone mat or parchment paper and place the grapes on top in a single layer.
2. Turn the oven to 250ºF and place the pan in the oven. You can use the convection setting in your oven on either Bake or Roast and speed up the process a bit.
3. After about an hour, check to see how they are doing; move them around on the sheet and sprinkle with a small amount of sugar if they taste too tart to you. Roast for an additional hour or until the grapes have lost some of their juice and shrunk some.

You can use these as an accompaniment to cheese or dessert, in salads, and in Italian Sausage with Red Grapes  or Chicken Salad with Walnuts and Grapes.

Makes about 3 cups
Adapted from John Ash’s Cooking One on One

Oven-Roasted Strawberries

Roasting concentrates the luscious strawberry flavor. You won’t believe it.


Strawberries
Sugar

1. Remove the stems and place the strawberries on a rimmed baking sheet covered with parchment paper or silicone mat.
2. Sprinkle lightly with sugar (about 1 tablespoon per basket).
3. Roast in a 300°F oven for about 1 to 1½ hours. Turn them over about half way through roasting. You can use Convection Roast if your oven does that. The roasting time will be shorter.
4. The strawberries are done when they have shrunk to about half their original size and are soft without being burned.
5. Store with any collected juices in the refrigerator in a covered container.

Serve with Fudge Brownies, anything chocolate, panna cotta, or shortcakes.

Adapted from Michelle Polzine’s suggestions in San Francisco Magazine, June 2007

Monday, March 21, 2011

Jamaican Rum Cake


1 cup (2 sticks) butter, at room temperature
2 cups sugar
4 large eggs
3 cups all-purpose flour
2 teaspoons baking powder
1 teaspoon salt
½ cup dark or light rum
6 tablespoons crushed walnuts, optional
Rum Syrup, see recipe below

1. Preheat the oven to 325ºF. Grease and flour a 9- or 10-inch spring-form pan.
2. Cream the butter and sugar with an electric mixer until they are fluffy. Add the eggs one at a time, blending until smooth.
3. Add the flour, baking powder, salt, rum and nuts, mixing until smooth. Pour into the prepared pan.
4. Bake in the oven for 1 hour and 10 minutes or until the cake bounces back when pressed gently in the center. A 9-inch pan may take a little longer.
5. Prepare the syrup. See recipe below.
6. When the cake comes out of the oven, poke it with toothpicks. Pour the hot rum syrup over the hot cake.
7. Let the cake cool before removing from pan.
8. You might want to microwave each piece before serving. You can serve it with rum raisin ice cream which is yummy but not necessary.

Rum Syrup

½ cup (1 stick) butter
½ cup sugar
½ cup dark or light rum

1. Put the butter and sugar in a small saucepan. Stir to combine as the butter melts.
2. Add the rum and bring to a boil for a few minutes.

10 servings
Adapted from Joan Nathan’s The New American Cooking

Sally Schmitt's Cranberry and Apple Kuchen with Hot Cream Sauce

I have had The French Laundry Cookbook on my shelf since November 2003—a long time. In these many years, I have made exactly one recipe from it. This one, in October 2004. I swear it is the only recipe in the whole book that I felt competent to tackle. But it quickly joined my list of “keepers” and has become a fall staple. Sally Schmitt was one of the original owners of The French Laundry Restaurant. She and her husband passed the restaurant and this recipe along to Thomas Keller when they decided to devote themselves to their apple orchards some distance to the north.


6 tablespoons butter, at room temperature
¾ cup sugar
1 large egg
1½ cups all-purpose flour
2 teaspoons baking powder
¼ teaspoon salt
¼ teaspoon freshly grated nutmeg
½ cup milk or half and half
3 apples
1 cup fresh cranberries, at room temperature, defrosted if previously frozen
Cinnamon sugar: 1 tablespoon sugar mixed with ¼ teaspoon cinnamon
Hot Cream Sauce, see recipe below

1. Preheat the oven to 350ºF. Butter a 9-inch cake pan or spring-form pan. Put a round of parchment paper in the bottom of the pan.
2. Peel, quarter, and core the apples. Slice them into ¼-inch wedges.
3. Beat together the butter, sugar, and egg in a bowl large enough to hold all the ingredients until the mixture is fluffy and light in texture.
4. In a separate bowl, combine the flour, baking powder, salt, and nutmeg. Add the dry ingredients and the milk alternately to the butter mixture, beginning and ending with the flour. Do not over beat; mix just until the ingredients are combined.
5. Spoon the batter into the pan. Press the apple slices into the batter, about ¼ inch apart and core side down. Work in a circular pattern like the spokes of a wheel. Put most of the cranberries in the middle of the cake and the remaining around the edges. Poke some into the dough. Sprinkle with cinnamon sugar.
6. Bake for 50-60 minutes or until the cake bounces back when softly pushed in the middle. Set on rack to cool briefly or let cool to room temperature.
7. Serve the kuchen in a good-sized puddle of the hot sauce. Pass the remainder in a pitcher.

Hot Cream Sauce

2 cups heavy cream
½ cup sugar
½ cup (1 stick) unsalted butter

1. Combine the cream, sugar, and butter in a medium saucepan and bring to a boil.
2. Reduce the heat and let the sauce simmer for 5-8 minutes to reduce and thicken slightly.

8 servings
Adapted from Thomas Keller’s The French Laundry Cookbook

Lemon Pudding Cake

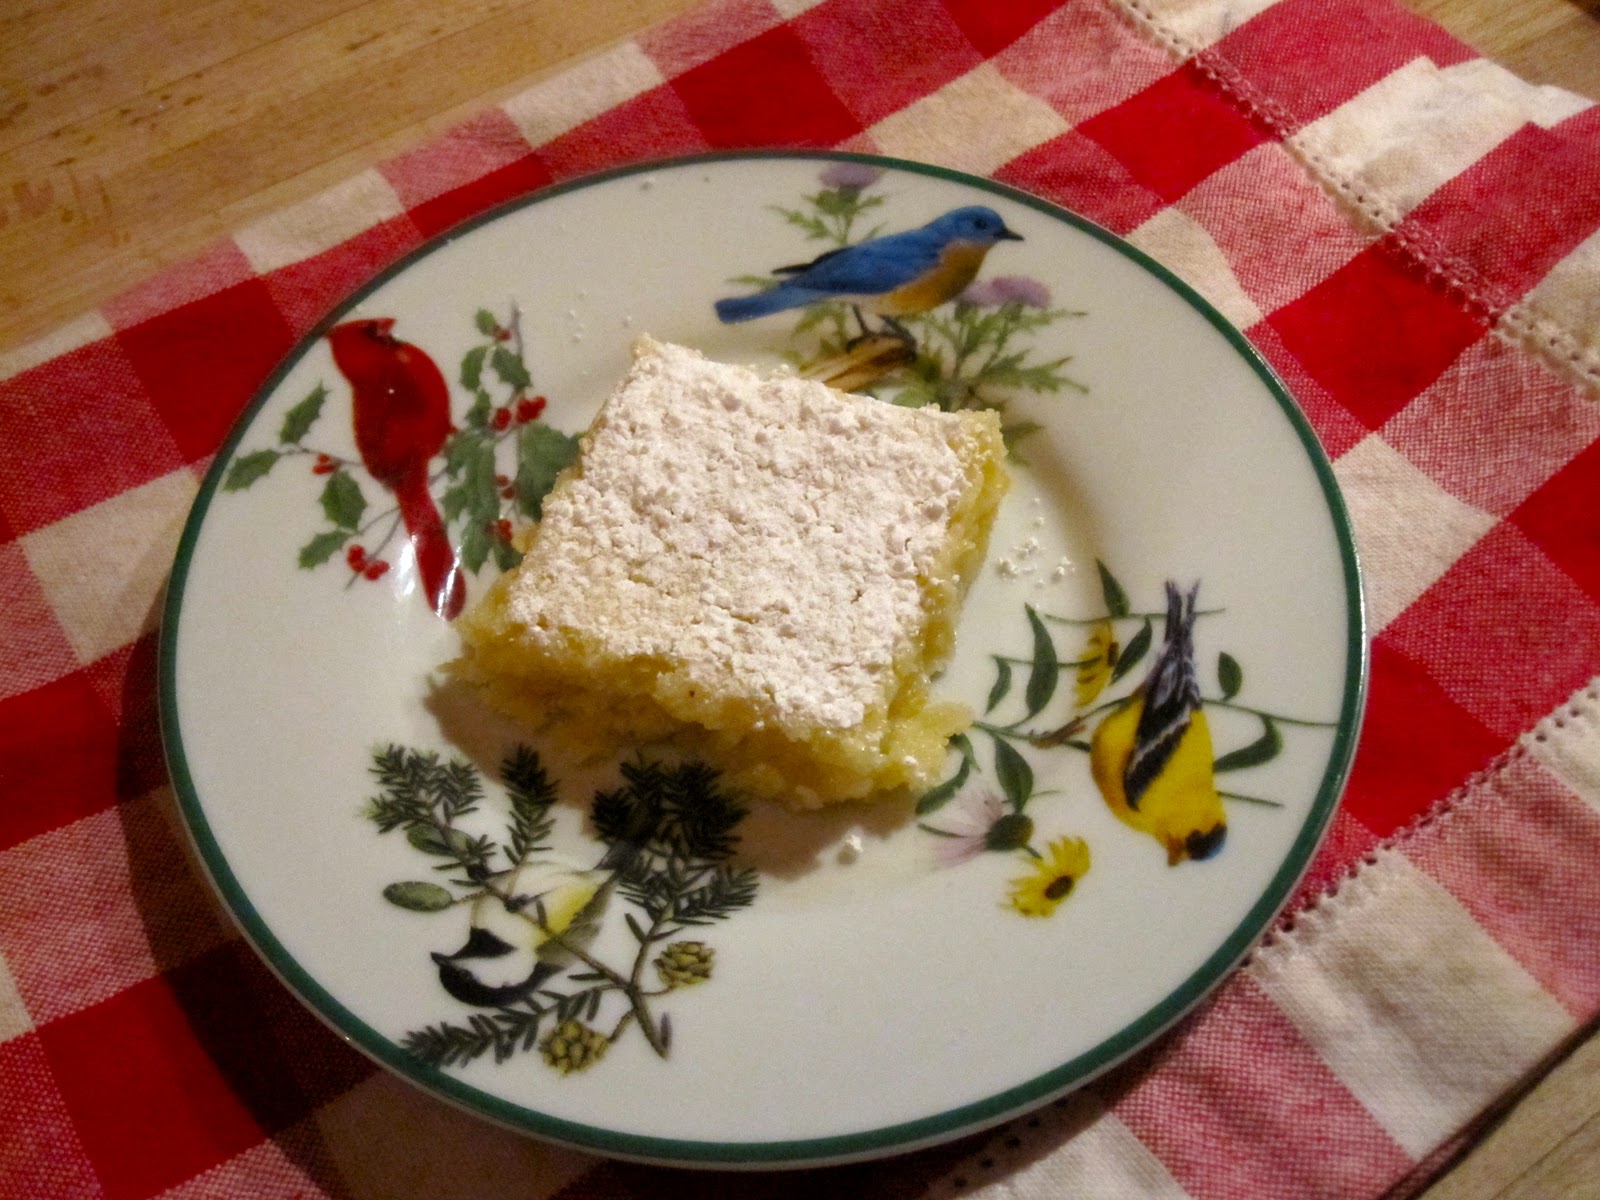
The miracle of this dessert is that the batter separates into a cake layer on top and a lemon sauce layer on the bottom. It’s magic.


1 cup sugar (divided ¾ cup and ¼ cup)
½ teaspoon salt
½ cup flour
4 tablespoons (½ stick) butter, melted
Zest of 1 lemon, see photos if you need them
1/3 cup lemon juice (1-2 lemons)
1½ cups milk
3 eggs, separated, see instructions below

1. Preheat the oven to 350ºF. Butter a 1½-quart baking dish or an 8-inch baking pan.
2. Mix ¾ cup sugar, the salt, and the flour together in a bowl. Add the melted butter, lemon juice, lemon peel, and egg yolks, and stir until thoroughly blended. Stir in the milk.
3. In a separate bowl, beat the egg whites with the remaining ¼ cup sugar until they are stiff but remain moist. Fold the beaten whites into the lemon mixture. Pour the batter into the prepared baking dish.
4. Set the baking dish in a larger pan at least 2 inches deep and pour enough hot water into the larger pan to come halfway up the sides of the baking dish. Bake for about 45 minutes, or until the top is lightly browned.
5. Serve warm or chilled. Blueberries or raspberries, or any other fruit of your choosing, would be great on the side.

6 servings
Adapted from Marian Cunningham’s Lost Recipes


How to separate eggs (the yolks from the whites)

The most important thing about separating eggs is to keep any of the yolk from contaminating the whites. Yolks are fat and fat keeps egg whites from expanding when whipped. Generally the whole point of separating eggs is to whip the whites into a froth, then into soft peaks and finally to fold them into something else.

1. Place two bowls side-by-side on your counter. One will be for the white and the other for the yolks. You’ll be working over the bowl for the whites.
2. Crack the center of your egg on your counter.
3. Split the egg shell apart with your thumbs, forming two small egg shell cups. The yolk should be in one of them.
4. Tip any white out of the other one and gently transfer the yolk to the empty half, allowing the white to run into the bowl.

5. Pass the yolk back and forth between the two halves until all the white has run into the bowl. Pop the yolk into its bowl.
If you are nervous about breaking the yolk and contaminating the whites, you can do this procedure one egg at a time. After you have successfully removed the whites for one egg into the small bowl, put that white into the larger bowl and proceed one-by-one separating the eggs. Doing it this way means that if one yolk breaks, you’ve only lost one egg. I have had it happen on the eighth egg, not using this one-by-one method, and had to start over again, sometimes by first going to the store to buy more eggs. Use this method until you are really confident or be prepared to occasionally make scrambled eggs for a crowd.
             
How to beat egg whites

1. Put your egg whites in a bowl large to hold the whites after they expand considerably.
2. Using a wire whip, a hand eggbeater, or an electric beater, begin to whip the whites. They will first turn frothy.
3. Continue beating them until the whites hold a soft peak when you hold the beater up. The whites will be shiny.
4. Use them (generally folding them into something else) immediately.

Lemon Love Notes

There are many different recipes for what is traditionally in the South called Lemon Squares. What I like best about this recipe is its name. Isn’t it just wonderful? In addition, they are just lusciously delicious.


Crust:
½ cup (1 stick) butter, at room temperature
1 cup flour
¼ cup sugar
¼ teaspoon salt

1. Mix all ingredients in a food processor, with a mixer or with your hands.
2. Pat into a well-greased 9x9 or 9x11 pan (for a thinner crust). Bake 15 minutes in 350ºF oven until the crust is a light brown. Cool slightly.

Topping:
3 eggs
1 cup sugar
3 tablespoons flour
¾ teaspoon baking powder
½ teaspoon salt
Zest from 2 lemons, see photos if you need them
Juice from 2 lemons
Confectioners’ sugar to dust

1. If you’ve used a food processor to make the crust, don’t bother to wash it before you do this next step. Process or beat eggs until light; beat in sugar, adding slowly. Mix in the rest of the ingredients and pour into the pan.
2. Bake in 350ºF oven for 25 minutes or until the topping is set.
3. When cool, dust with confectioners’ sugar. If your confectioners’ sugar is lumpy, put a small amount in a sieve and sprinkle it over the squares, squashing the lumps through the sieve with your fingers. Cut into squares with a wet knife.

Makes 16-20 squares in a 9x9 pan
Adapted from the Junior League of Roanoke Valley Virginia's Of Pots and Pipkins: Recipes

Fudge Brownies

I’ve been using this recipe for years and years. The round pan will give you a dessert that looks more like a cake than a cookie.


½ cup (1 stick) butter, at room temperature
1 cup sugar
1 teaspoon vanilla
2 eggs
2 1-ounce squares unsweetened chocolate, melted
Note: You can melt the chocolate in a microwave for 4 minutes at 50 percent power.
½ cup flour, sifted
¼ teaspoon salt
½ cup walnuts, optional

1. Cream butter, sugar, and vanilla. Beat in eggs.
2. Blend in melted chocolate. Stir in flour and nuts.
3. Grease an 8x8 square or an 8-inch round pan. If you are using the round one, line it with parchment paper for easier brownie removal. Pour the batter into the pan and bake in a 325ºF oven for 30-35 minutes. The round one may take slightly longer.
4. Cool and cut into 16 squares or as for a cake. You can serve with Oven-Roasted Strawberries.

You dramatically improve the quality of the brownies if you use good chocolate.

Makes 16 squares or 8-10 slices
Adapted from Better Homes & Gardens New Cookbook

Classic Oatmeal Cookies


1¾ cups all-purpose flour
¾ teaspoon baking soda
¾ teaspoon baking powder
1 teaspoon salt
1 teaspoon ground cinnamon
½ teaspoon ground nutmeg
½ pound (2 sticks) butter, at room temperature
1½ cups packed light or dark brown sugar
3 tablespoons honey
2 large eggs
2½ teaspoons vanilla
1 cup raisins
3½ cups old-fashioned rolled oats
1 cup chopped walnuts, optional
You can always add some chocolate chips if you want, but your cookies won’t be “classic” in the same way.

1. Position rack in the upper third of the oven. Preheat the oven to 350ºF. Grease or use silpats on two rimmed baking sheets.
2. Combine the flour, baking soda, baking powder, salt, cinnamon, and nutmeg in a medium bowl.
3. In a bowl large enough to hold all the ingredients, beat together the butter, brown sugar, honey, eggs and vanilla until well blended. An electric mixer is pretty much essential.
4. Stir the flour mixture into the butter mixture. Add the raisins, rolled oats and walnuts if desired. Mix well. You may need to use your hands.
5. Drop 1-inch globs of dough from a tablespoon on the cookie sheets. Allow about 2 inches between the globs. Bake for 12 to 15 minutes or until the cookies are lightly browned all over and almost firm when lightly pressed in the center of the top.
6. Remove the sheet to a rack and let stand until the cookies firm slightly, about 2 minutes. Transfer the cookies to a rack to cool and store in tins in the freezer (to help me resist temptation).

Makes 60-80 cookies, depending on their size
Adapted from the Irma S. Rombauer et al’s 1997 edition of The All New Joy of Cooking

Lavender Shortbread Cookies


½ cup plus 1 tablespoon sugar
12 drops lavender essential oil
½ teaspoon salt
8 ounces (2 sticks) butter, at room temperature
1 large egg
2 1/3 cups cake flour or unbleached regular flour
1 large egg white
1½ tablespoons dried lavender flowers
1 tablespoon sugar for sprinkling

1. In a food processor, blend the sugar and essential oil for 15 seconds, until well combined. Add the salt and the butter and pulse until the butter is well incorporated. Add the egg and pulse until incorporated. Add the flour and carefully pulse, until the dough forms small pebble-like shapes. Remove the dough from the processor and gently combine by hand until smooth. Wrap and refrigerate for at least 2 hours.
2. Roll out the dough to a thickness of ¼ inch.
Note: You may need to let it soften slightly before attempting to roll it out. Rolling it out between two sheets of plastic wrap may be helpful.
3. Line your rimmed baking sheet with parchment.
4. Cut the dough into rectangles and transfer to the baking sheet, leaving about 1 inch between each shortbread. Refrigerate for about 20 minutes. If you have bits of leftover dough, mush them together, chill slightly, roll them out to ¼-inch thickness, and add to the baking sheet.
5. Preheat the oven to 325ºF.
6. Whisk the egg white in a mixing bowl for about 10 seconds, until it is frothy. Remove the cookies from the refrigerator, brush with the egg white and sprinkle with sugar and lavender flowers, pressing them slightly into the dough.
7. Bake until the edges are just starting to turn golden brown, about 15-20 minutes. Let cool before serving. The flavor and texture are much better at room temperature.

Makes about 27 2x2 inch cookies
Adapted from Mandy Aftel and Daniel Patterson’s Aroma

Apple Crumb Pie

This is such a delicious dessert. Basically it’s an Apple Crisp with a granola-like crust. A little more complicated than I usually make. But after a nice simple dinner, it is a splendid treat. Plus I get to use more of my apples from the backyard tree.


Crust:
1 cup flour
¼ teaspoon salt
½ cup firmly packed brown sugar
1/3 cup rolled oats
6 tablespoons butter, melted

Filling:
6 cups peeled and sliced apples (about 7)
½ cup sugar
2 tablespoon flour
½ teaspoon ground cinnamon
½ teaspoon coriander
Zest from 1 lemon, see photos if you need them
1 tablespoon lemon juice (½ Meyer lemon)

Topping:
¾ cup flour
½ teaspoon salt
½ cup firmly packed brown sugar
¾ teaspoon ground cinnamon
6 tablespoons butter
¼ cup finely chopped candied ginger, optional

Serving options: whipped cream or ice cream

1. Take your 8½-inch spring-form pan apart.
Place a large sheet of aluminum foil over the round base/bottom of the pan.
Place the sides on the base over the foil and attach to the base. Fold the excess foil up around the outside of the pan. (This procedure is an attempt to prevent leakage in baking.)

2. Place the crust ingredients in a bowl and stir with a fork until completely combined. Press the mixture into the bottom of the spring-form pan. Bake for 10-15 minutes at 350°F.
3. Turn the temperature up to 375°F.
4. Place the apples, sugar, flour, cinnamon, lemon zest and juice in a large bowl and stir until the sugar is evenly distributed. Pour the apples into the crust and press down lightly to even them out and pack them down.
5. Place the topping ingredients in a bowl and mix with a fork, a pastry cutter, or your fingers until crumbly. Distribute evenly over the apples.
6. Place the pie in the oven with a baking sheet on the rack below to catch any drippings. Bake for 50-60 minutes or until the top is golden brown and the apples are soft. If the top browns too quickly, cover the pan loosely with foil and continue baking. Cool on a rack.
7. To serve, slip a knife around the sides of the pan to loosen the filling; release the sides of the spring-form pan. Slide the pie off the spring-form bottom and onto a serving plate leaving the foil underneath. Peel the foil from around the edges, leaving the rest hidden underneath the pie. If you find an easy way to remove all of it, let me know. When you cut the pie, leave the foil on the serving plate. Serve the pie with lightly sweetened whipped cream or ice cream.

6 servings
Adapted from Megan and Jill Carle’s Teens Cook Dessert
This is a great cookbook for any young person you know who likes to cook.